Rock gardens
are not just gardens full of rocks. A
traditional man-made rock garden can contain
a ton (literally) or more of rocks, but
they are placed artfully among the rock
garden plants that will surround them.
In nature, rock garden plants occur in
pockets between the stones where soil
has blown in or scree (bits of ground
up rock) has been created by the action,
over eons, of wind and water. The plants
that survive in those conditions have
evolved over time to require excellent
drainage. many rock garden plants would
do poorly in the average garden border
where they might receive too much water,
but they thrive in the most dry areas
of the landscape where other plants won't
grow. Sound interesting?
With a little planning (and some work)
you can create a rock garden of your own
wherever you live, even where there is
high summer humidity as in our region.
Your rock garden will be most successful
when you mix rock garden perennials, small
garden shrubs and trees, and dwarf varieties
of other plants that can be adapted to
rock garden culture in the area.
You can do it yourself or hire a professional
designer and installer to do the work
for you. In either case, the idea is that
the garden should look as if it were created
by nature, as though the gardener’s
hand has never touched it. Plants should
appear as though they blew in with with
wind and landed randmomly in the garden.
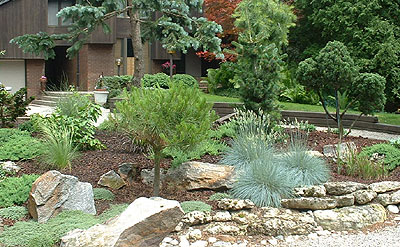
Rock gardens can be located in sunny
or shady areas so long as the soil is
consistently dry, and well-drained. Rock
gardens are really beautiful so try to
position one where you can see and appreciate
it from a window inside your home or near
outdoor living areas where you will spend
time outdoors. If you can see it every
day, you will appreciate it all the more.
Hillsides and slopes are perfect for
building a rock garden on. Rock gardens
can be made on flatter ground, but even
slight elevations in parts of your garden
will make it look more natural and provide
the drainage that most rock garden plants
prefer.
If your rock garden will be small, you
and your family can probably handle the
earth and rock moving chores yourselves.
However, if you intend to place large
boulders in the garden or on a hillside
it might be best to consider having professionals
who have the experience and necessary
equipment.
The rocks placed in your garden should
look as natural as possible. That may
sound like a no-brainer, but there are
several things to consider. If possible,
use some rocks and boulders found on your
own property. If there are none, or not
enough, visit a local stone yard to choose
rocks that will blend with the environment
and with rocks that may already be there.
Each rock has several surfaces; usually
all of the back and bottom surfaces and
much or all of the top and sides will
be buried in the garden soil. Therefore,
choose stones that have interesting “faces”
(the front surface, the one that you will
see most or all of) and bear in mind that
the “grain” of each stone’s
face should run in the same direction
– again to mimic nature.
Size of rocks is also a factor. The stone
outcroppings in an actual hillside will
be of many different sizes and shapes,
and that is what you want to duplicate.
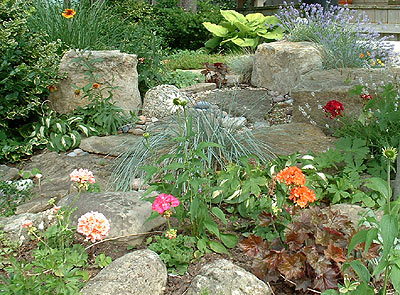
Just as in any garden, you will want
something to be in bloom during each season:
Place a few smaller growing specimen
trees in the garden if space allows. Japanese
Maples, Hollywood Juniper, and Hinoki
Cypress are excellent selections. You
might want to check out the Japanese
Garden Plants for some ideas as well.
Bear in mind that even in natures rock
gardens, where most of the plants are
quite tiny, there is variation in the
overall size and shape of the plants as
well as in the size, shape and color of
the leaves and flowers. Just make sure
that the plants you choose are drought
tolerant - requiring little, if any atatention
to watering.
Combining the rocks and the plants can
be a wonderful creative exercise and fun
for the entire family. Even if you are
using professionals to design the garden,
your input should be welcomed and acted
upon. It is, after all, your garden. Use
the descriptive listings with photos on
our site as a source for selecting the
drought tolerant rock garden plants that
perform well in our area (zone8). These
plants should be the staple in your garden.
Drought
Tolerant Perennials I
Drought
Tolerant Shrubs
Building
& Planting Your Rock Garden
Steep
Slope Rock Garden - When
planting a rock garden on a steep slope
there isn't much one can do to safely
go about tilling or preparing the soil.
Usually these areas are well-drained and
do not require preparation anyway. Choose
smaller rocks and boulders that you and
your friends and family can manage, or
have a professional landscaper place larger
ones for you.
After boulders and rocks are in place
you can go ahead with planting plants
you have selected. On steep slopes it
is best to integrate groundcovers, such
as creeping sedums, that will spread throughout
the garden area and between other plants
and shrubs. The groundcovers will prevent
erosion and also replace the need for
mulch.
Space larger growing shrubs a good distance
apart and use the smaller plants and groundcovers
between. Try to avoid overcrowding plants.
Rock gardens look best when each plant
can be noticed. Also avoiding planting
too many of the same thing. Try to make
every plant in the garden a different
one.
Use several different kinds of groundcovers
in patches throughout the garden. At the
nursery we stock several sedum groundcovers
to choose from at any given time. Most
sedums are evergreen which is a great
bonus.
When installing plants on a slope simply
remove them from their containers and
plant them so that the top of the root-ball
is level with the existing grade. Using
an organic soil ammendment mixed with
sand to add to the soil you remove from
digging the hole. Dig holes twice to three
times as wide as the container the plant
came in. Tamp soil mixture as you backfill
to remove any air pockets.
Level
Site Rock Garden - If
you know that the soil in a more level
site is rocky, sandy, and well-drained
you can follow the same instructions above
for planting a rock garden on a slope.
If you know or suspect that the site
you have selected for your rock garden
does not drain well then there will be
a little more soil preparation involved
before you can begin planting.
The best thing you could do is to raise
the bed area up by using sandy native
topsoil and then turning in additional
sand and gravel to enhance drainage. Raise
the bed up by 10" or more above existing
grade if possible.
If raising the bed is not possible you
will need to do the following:
Once a site is selected and its boundaries
are marked off, the area should be dug
out to a depth of at least a foot or more
especially in low ground. One condition
that rock garden plants plants almost
invariably require is good drainage. The
excavation should then be refilled with
a 50/50 mixture of the soil removed from
the excavation and gravel, rock, broken
brick, or other stone material. After
bacfilling soak the bed down so that soil
will fill any air pockets and then backfill
with more of the soil/gravel mixture as
is necessary to fill.
You are now ready to plant. Remember
not to overcrowd larger plants in the
rock garden. Select as many different
types of plants as possible including
groundcovers. Rock gardens should be interesting
to look at.
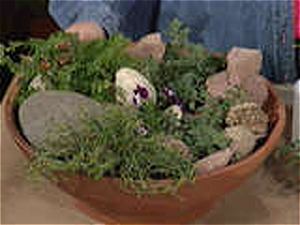 |
Miniature
Rock Gardens in Containers |
Designed to resemble a scene or natural
setting, rock gardens mimic nature. You
can easily create your own miniature rock
gardens in a container and display it
on your patio or indoors, depending on
the plants you choose. For an outdoor
rock garden, select herbs, succulents
or annuals. For an indoor garden, try
low-growing tropical plants.
When you're digging in your yard, on
vacation or traveling, keep your eyes
open for interesting rocks. You'll be
amazed at the variety you find. You can
also find a variety of smaller stones
at your local stone yard - sometimes they
will give the tiny ones to you.
The project described below combines
herbs and annuals. Select plants with
the same requirements for water and sun
or shade and varieties that are low-growing
or trailing so they won't obscure the
rocks. Choose plants with foliage textures
and bloom colors that harmonize with the
rocks. Hens and Chicks and small sedums
are excellent selections for a container
rock garden.
Materials:
- Container - Preferably made from clay,
stone, or concrete
- Potshard or gravel to cover the drainage
hole
- Lightweight potting soil
- Plants - Succulents, sedums are great
selections
- Small rocks
- Pea Gravel
NOTE: Depending on the
size container you select, the finished
project could be quite heavy. Consider
building it where you plan to keep it!
1. Begin by placing a potshard - or a
piece of plastic window screen - in the
bottom of the container to prevent soil
from washing out. Place some gravel or
small rocks in the bootm of the container
as well.
2. Then fill the container half-full
of fast-draining potting soil. Add small
pea gravel to heavier potting soils that
retain too much moisture.
3. Select rocks with interesting textures
and shapes, and experiment with their
placement atop the soil until you like
the look of the container. Place the tallest
rock toward the back or center of the
container if it will be viewable from
all sides.
4. Place taller plants toward the back
of the pot or center, gently loosening
their root balls before planting. If you
like, move the rocks out of the way to
make planting easier. After planting,
water well.
5. Cover any spaces where soil shows
with pea gravel |